Wednesday, March 31, 2010

Renovation Setbacks - annoying, but humorous

Remember how we started my family room reno 6 months ago? I didn't share all the bad because I try really hard to be positive on here. Let's just say it's been taking a LOT longer than we originally planned.

Everyone that has done a large reno knows how it goes:
• everything that can go wrong will go wrong...plus more!
• it will cost you way more than you ever thought
• it will take longer than you planned
• you feel the hardware store is your home away from home
• you get so sick of it that you give up for a couple weeks...or months!

In honor of how much renovations can suck, I'd like to show you some of the negatives we have experienced...


This little corner...
This DARN corner...
Just cutting the crown for this stupid corner took 3 weeks, numerous screaming matches, a hammer thrown at a ladder, and a lot of frustrated tears.


See this lovely window? Oh wait, don't forget to check out the crack in the window. Let's just say that if you weren't aware that the window hardware had to be screwed on at an angle, you will crack your window. We now have 2 windows that need to be replaced.

See that door that's almost closed? That's our basement door. Let's just say someone got a little frustrated one day and punched a hole in it. Luckily, it was already patched when I woke up in the morning.

This is our hearth while we tiled it. Too bad I didn't like how it looked, so we had to pull up ALL the tile and start again. Oh and don't forget how the store was out of our tile so I had to drive to 3 other ones to find enough pieces to finish.

See our ugly bookcase in this picture?
Do you know how many coats of paint it takes to cover that nastiness? SIX!

That was actually a lot of fun to look back and see all the crap we had to go through to get to this point. I hope you enjoy laughing at us!

Anyway, we are now at the point where we are *almost* done. The new buffet we ordered is coming in in about 7 weeks. The electrical just needed to be finished up by a family member. And I've been working on filling the giant bookcase so the room isn't so empty.


I'm sure a lot of you can add to this list and feel free to leave a comment tell me how much your reno is stressing you out. I can relate!


This is an entry for PartSelect’s $5000 GE Giveaway contest.

Sunday, March 28, 2010

Passover Chocolate Pecan Coconut Macaroons


Don't these look amazing? That's because they are!


Work has taken over my life, so I was only able to make one Passover recipe so far. Also see this post for another really yummy Passover apple cake recipe that I made last year.

Anyway, macaroons are something I look forward to every year on Passover. Until recently, I never knew that macaroons were not just Jewish thing. According to Wikipedia, "The English word macaroon and French macaron come from the Italian maccarone or maccherone. This word is itself derived from ammaccare, meaning crush or beat, used here in reference to the almond paste which is the principal ingredient."

So while these have a small amount of matzah meal in them, they taste great and they can really be made any time of year.


(Recipe adapted from Cooking Light)
Yield: 24 cookies

Ingredients:
• 2 1/4 c powdered sugar
• 1/2 c unsweetened cocoa
• 1/2 c shredded coconut
• 2 T matzo meal (can be replaced with cracker crumbs or ground oats if you don't want the Passover version)
• 1/8 t salt
• 3 egg whites
• 1 t vanilla
• 3/4 c chopped pecans

Preheat over to 325.
Combine first 5 ingredients in a large bowl and mix with a whisk.

If pecans needs to be chopped, I usually put them in a baggie and use a meat pounder to crush them.

In another bowl, beat egg whites until frothy. I have recently learned from a chef that this step makes a huge difference. The more frothy and thick, the better the macaroons will come out. You should be tired and sweaty once you're done with this step.

Add the eggs to the large bowl with the dry ingredients. Add vanilla and pecans and mix well.

Cover a baking sheet with parchment paper. Then scoop out 1 T for each cookie and place about an inch apart on the cookie sheet.

Bake for 15 minutes or until cookies are dry on the surface and soft inside.

Mmmmm...enjoy! I can't wait to serve them tomorrow!

Saturday, March 27, 2010

Easy, Lowfat Tuna Panini

I've had a tuna obsession lately so I've been busy looking for fun recipes. I combined a few different tuna sandwich recipes to create this one.

Ingredients:
• 1 can of chunk light tuna, drained
• 1 tomato, chopped
• 1/4 cup crumbled feta cheese
• 1 teaspoon capers
• 4 tablespoons red onion, chopped
• 1 teaspoon lemon juice
• 2 tablespoons kalamata olives
• 2 tablespoons marinated artichoke hearts, chopped
• 1 boiled egg, chopped
• pepper (to taste)
• sliced bread

Combine all ingredients in a large bowl

Mix well.

Ok, so there's 2 ways to make your panini: the EASY WAY and the REAL WAY.

The EASY WAY: Toast your bread and spread a thin layer of butter on it while it's still warm.
The REAL WAY: Heat 1 teaspoon of canola oil in a large skillet over medium heat. Put slices of bread in the pan. Then take another smaller skillet and place it on top of the bread to push it down. Use some extra cans of food to weigh down the skillet. Cook the bread until it's golden on one side (about 1-2 minutes). Flip the bread and cook the other side.

Either way you prepare your bread is yummy, IMO. Just depends how much time you have.

Scoop some tuna salad on your warm bread and top with cheese.


Enjoy!

Wednesday, March 24, 2010

More adorable baby gifts!

Remember my super cute baby closet tags I made a few months ago?

I made more!


See my detailed tutorial here.


Now off to the post office to send these to the proud grandma!

Sunday, March 21, 2010

The BEST Lowfat Mac & Cheese

Yes, I said LOW FAT mac & cheese.

This recipe was SO good that I thought about it all day long at work and dreamed of eating leftovers for dinner when I got home! (Recipe adapted from here)

Ingredients:
• 16 oz. uncooked pasta
• 2 cups shredded 2% sharp cheddar cheese
• 1 cup shredded smoked gouda
• 2 cups fat free cottage cheese
• 2 cups skim milk
• 2 tsp. dry mustard
• 2 tsp. dried parsley
• 2 tsp. onion powder
• 1 tsp. salt
• 1/4 tsp. pepper
• 1 tablespoon grated parmesan cheese
• 1 tablespoon bread crumbs

Preheat oven to 375. Cook pasta according to directions on the box.

While the pasta is cooking, mix cottage cheese, milk, dry mustard, parsley, onion powder, salt, and pepper in the blender.

Grate cheese into a large bowl.

Make sure pasta is drained and cooled. Mix with shredded cheeses.

Add mixture from the blender and mix well.

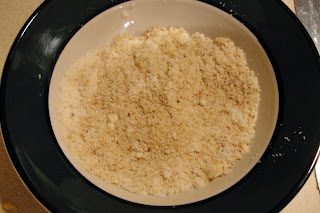
Combine parmesan and breadcrumbs in a small bowl.

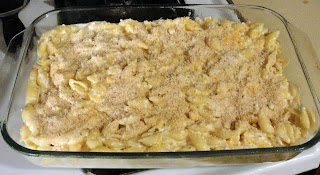
Pour cheese & pasta mixture into a greased baking pan and spread evenly.
Lightly top with the parmesan & breadcrumb mixture.

Bake for 45 minutes.

Then PIG OUT! Yum!


Friday, March 19, 2010

Signs of spring...and my TRUTH

I am SUPER excited about winter being over. There are signs of spring popping up everywhere and it puts a smile on my face.

I switched out our front door decor to this leafy green wreath.
I love hanging this as my first hint of warm weather to come!


Our little plants haven't been doing so well lately, so we decided to give them a new home. These pots were old, cracked, and dirty, so it was time for something bigger & better.
We found these pretty textured pots at Ikea.
Using some new potting soil, we replanted our plants in these larger pots.
And all the snow in our yard is GONE!
I'm looking forward to breaking out the spring clothes, opening windows, and enjoying the warm weather!

• • •

And on another topic, earlier this week I posted about my first blog award.


I was given the task of writing 7 statements about myself - one true and 6 false.

So here's my answers in case you were curious:

1. I enjoy watching The Weather Channel.
FALSE - It can get pretty boring to watch that and I'm too impatient. MTV, E! and TLC are more my style

2. My husband and I met at a fraternity party.
TRUE - Neither of us were Greek, but we ended up at the same party one Feburary night in 2002. I still have the sequined hot pink halter top I was wearing that night!

3. My cat lived on a farm before we adopted him.
FALSE - Kitty was actually found abandoned in a patch of chrysanthemums. He was brought to a rescue in Iowa where I saw him and fell in love!

4. I love going to see movies.
FALSE - I hate going to movie theaters. I'd rather be in bed with my feet up and watching a tv show.

5. My favorite food is ice cream.
FALSE - While I do love me some ice cream, it's not my favorite food.

6. I played soccer as a child.
FALSE - Are you crazy? I'm way too much of a girly girl for that! I was a dancer and gymnast.

7. I wear glasses when I read.
FALSE - I don't wear glasses at all, but sometimes I think I should...

Thanks for playing along!

Tuesday, March 16, 2010

My first blog award!


Thanks to Cara from Cara's Cravings who presented me with my first blog award!

So, here's how it works. I'm supposed to leave 7 creative tidbits about myself, but only 1 is true. So that means 6 of them will be lies. You'll try to figure out which is one true and let me know what you think. I will also pass this award on to 6 other awesome bloggers.

My Creative Tidbits :

1. I enjoy watching The Weather Channel.
2. My husband and I met at a fraternity party.
3. My cat lived on a farm before we adopted him.
4. I love going to see movies.
5. My favorite food is ice cream.
6. I played soccer as a child.
7. I wear glasses when I read.


So play along in my game and leave me a good guess as to which one is TRUE!


Now, I get to pass this award along to some of my favorite blogs.

There are so many to pick from, so here's just a few of my faves that you might not know about.

1. Adventures in Home Cooking
2. Outnumbered
3. Little Big Nest
4. Southern Hospitality
5. The Happiness Project
6. Confessions of a Food Whore

Question: So which of the above statements is my TRUTH?


Monday, March 15, 2010

Yummy St. Patrick's Day Devils Food Cookies


It's been a weekend of St. Patrick's Day preparation and festivities, so I wanted to share these yummy cookies I baked last night. They aren't the most pretty cookies, but they taste great and they were super easy to make.
Thanks to my friend Amy for the great recipe!

Ingredients:
• 1 box devil's food cake mix
• 1/3 cup butter
• 1/3 cup water
• 1 egg
• peanut butter chips
• 1 container of frosting
• green and yellow food coloring


Heat oven to 375 degrees.
Combine cake mix, butter, water, egg, and peanut butter chips in a large bowl.

Mix well until a smooth dough forms.

Lightly grease cooking sheets with cooking spray.
Then shape dough into 1-inch balls and place on the cookie sheet.
Warning: this is very messy and sticky!

Lightly spray a spoon with cooking spray and press gently on each cookie to flatten it.

Bake cookies for 10-12 minutes. Let them cool completely before starting the frosting.

To create the green frosting, I used a container of vanilla frosting and some food coloring. These cookies would also be great with chocolate frosting, but then they wouldn't be green : )


Pour frosting into a bigger bowl. Add 5 drops of green and one drop of yellow food coloring to the frosting. Mix well until the color is uniform throughout.

After the cookies have cooled, spread frosting on each cookie. These would be really cute with green sprinkles, so maybe next time I'll add those too.

Enjoy!
Happy St. Patrick's Day!

Related Posts with Thumbnails