Wednesday, December 28, 2011

Really? You really love me?

I was beyond shocked that I hit 600 followers today.

I don't spend nearly the amount of time that I would like crafting, sharing & meeting other bloggers, but you all know how life gets busy. Thanks for sticking with me and always leaving me such sweet comments!

So as this year comes to a close and my blog hits a milestone, I wanted to wish all my friends out there a HAPPY NEW YEAR and a wonderful 2012!


Tuesday, December 27, 2011

The Best of 2011

This is the 3rd year I've done a year recap and it's always fun to look back and see everything we've accomplished during the past 12 months.

Project: What did you start this year that you're proud of?

The fireplace was the first project we started on when we moved into our house over 2 years ago. It was a bit too much to take on right away, but after many months, we finally had a beautiful fireplace and mantel to look at! See the amazing transformation here.

Another big project we tackled was the wood buffet we put in our family room. After major drama with the store we bought it from closing unexpectedly and filing for bankruptcy and then dealing with attempting to stain and paint in the middle of winter in the garage, we finally finished it! It's so great for storage and it fits perfectly in the space. See all the drama and more photos here.


Recipes: The yummiest cooking from the past year


Best Craft: What got your creative juices flowing?

This is so hard to pick! I had to decide on a few of my favorites to share...


Night Out: Did you have a night out with friends or a loved one that rocked your world? Who was there? What was the highlight of the night?
I can't say I had many (or any) of these in 2011. Considering I was pregnant or had a newborn baby for the entire time, there weren't too many nights that I was out. Since that doesn't apply, I'll go with one of my favorite days out - my baby shower. It was so much fun to see all my family & friends who came to celebrate the upcoming birth. Everyone was so generous to give us such wonderful gifts.

Challenge: Something that really made you grow this year. That made you go to your edge and then some. What made it the biggest challenge of the year for you?
Nothing has made me grow more than becoming a mom to an adorable little boy. I'm so happy to have him and I feel so fulfilled. The "pursuit of happiness" is now a lot easier to achieve with him around!

The Best Place:
Without a doubt, my favorite place this year was the nursery. This room was a work in progress for most of the year, but we finally finished it just in time for the arrival of the baby. See the details and decor here.


New Food:
Circus peanuts. Hubby apparently used to like these as a kid so his grandma bought him some at Thanksgiving. He forced me to try one. Ewww. Not a fan.
Best Accomplishment:
I survived pregnancy, childbirth and being a new mom! My baby blog documented my infertility, BFP, pregnancy, and the birth of the baby if you're interested in reading. I'm so proud to have gone through all of this and come out happier than ever with a beautiful new son that I love.

New person/people:
Of course, this has to be Connor. The newest addition to our family!

Web Tool:
I think most people would say Pinterest, but I'm avoiding getting addicted to that by staying away. This sounds so minor, but this year I figured out how to cut & paste images in blogger when I'm writing posts. This saved me so much time!

My goals for 2012:


• Continue to enjoy every moment with my baby son

• Finish updating all the doors & trim in the house

• Try to start cooking a little more again (I got a little side-tracked in 2011 with being pregnant and crazy house renovations)

Monday, December 19, 2011

Cranberry Pumpkin Biscotti

I had a strange craving recently...for biscotti! I'm not sure why, but it sounded really goods and I kept thinking about how yummy it would be dipped in coffee or milk. I made some for myself and also to bring to work and they were gobbled up very quickly!

Adapted from From Apples 2 Zucchini

Ingredients:
4 1/2 c. flour
• 2 teaspoons pumpkin pie spice
• 1 teaspoon baking powder
• 1/2 teaspoon salt
• 3 eggs
• 1 1/3 c. sugar
• 3/4 c. canned pumpkin puree
• 1 teaspoon vanilla
• 1/2 cup applesauce
• 1 c. fresh cranberries

Preheat oven to 350 degrees. Cover a baking sheet with parchment paper.

In a medium bowl, mix flour, pumpkin pie spice, baking powder, and salt.

In large bowl, beat the eggs and sugar until the sugar dissolves and the eggs become pale yellow and foamy. Add the pumpkin and vanilla and mix. Slowly stir in the applesauce and cranberries.

Carefully mix in the flour mixture until the dough forms a ball.

Lightly cover your hands with flour and mold the dough into a 4 inch by 14 inch log.

Carefully pick up the dough and place on the baking sheet covered with parchment paper.
Bake for 50 minutes or until the top is golden brown and feels firm.

Let the biscotti cool to room temperature. Then uses a serrated knife to cut 1/2-inch slices.

Place slices back on the baking sheet cut side down and bake for another 25 to 30 minutes, or until they are crisp and golden brown. For a softer cookie, bake them a little less.

Let biscotti cool and serve with coffee or milk.

Dipping in milk! YUM!

Wednesday, December 14, 2011

Edible Marshmallow Hanukkah Dreidels

Hanukkah is coming soon! I'm very excited this year because it's Connor first Festival of Lights! It's also later this year so it makes things a lot easier for me and I feel like I can get more into the holiday spirit.

I have a lot of coworkers that celebrate Christmas and don't know very much about Jewish holidays. Since we're taking turns bringing in holiday treats every day for the next 2 weeks, I decided to make mine into a mini teaching lesson as well as a tasty treat.

Edible Dreidels!
Thanks to Danielle at Mostly Food & Crafts for this idea I saved from last year. All you need are marshmallows, thin pretzel sticks, peanut butter, and Hershey kisses.

And if you're interested in more info about the dreidel or how to play the dreidel game, go here

Monday, December 12, 2011

Easy 50¢ Snowflake Ornaments

I was looking for some easy ornament gifts for family members to show off Connor's holiday photos. When I was at Joanns, I noticed these felt snowflakes and rhinestone stickers for $1 each.

To turn the snowflake into a frame opening, I cut out the middle section. The left snowflake shows how they looked when I bought them and the right snowflake shows how I cut out the middle.
Then I used the little rhinestones to accessorize the snowflake because...well, why not?

To make a backing for the frame, I used some white glitter felt and traced around the snowflake shape.

The turned out to be stars which is kinda cute!

Then I traced around the snowflake again so I would have the right size photo for the opening.

I glued the back of the photo to the felt star backing using some Elmer's glue.

And then I glued the photo onto the back of the snowflake and let it dry. I had to glue the corners again just to keep the edges down.

Using a large needle, I added a silver ribbon to the top of the snowflake.

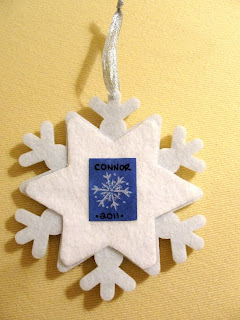
Because I'm a crafty hoarder, I save old holiday cards. I found a glitter snowflake one and cut out a little piece to use as a label on the back of the frame.

We don't have a tree up this year (sad face), so I don't have any fun photos of it on a tree branch. But I'm sure it will look nice on the trees of the family members that get one!

Thursday, December 8, 2011

My Favorite Hanukkah Projects

In honor of Hanukkah coming up, I wanted to share some of my favorite Hanukkah posts from the past few years. Those of you who celebrate know it's challenging to find fun crafts and decor ideas when everything is Christmas. Hope this helps spark some ideas!

Spin the Dreidel Wood Blocks

Monday, December 5, 2011

Sew a Baby Santa Hat

Here's a secret: I have an obsession with dressing my baby up in cute outfits and taking photos. The best part about little ones is that you can dress them up however you want! Maybe he'll be embarrassed in 10 years, but for right now, I love it. This little Santa hat was really easy to make and it was nice to have a hat that actually fit his little head!

To make sure the hat fit, I used one of his other hats as a template on 2 pieces of stretchy red knit fabric.

I traced around the hat and then altered the design slightly to be more of a Santa hat shape.

Then I cut it out and sewing around the edge, but left an opening at the top for the furry ball.

I had a small piece of white fur left over from my fur-trimmed tree skirt I made last year and it worked perfectly for this hat.
I folded up the bottom edge of the hat and sewed around it.

Then I added some fur trim along the edge and sewed it on.

For the puff at the top, I took a small piece of fur and rolled it into a thin cylinder. I quickly hand-stitched it closed so it wouldn't unravel.
The fur roll got placed in the opening at the top of the hat and I used the sewing machine to attach it.

Just to add a little more fur, I sewed on another thin strip along the top.

And here's my little elf! Not so happy here, but he's still cute!

That pacifier always solves the problem : )
Related Posts with Thumbnails