Monday, February 27, 2012

Yummy Crab Mac & Cheese

We were watching some show on Food Network and happened to see someone make lobster mac & cheese. Since we LOVE mac & cheese, we decided to make our own version using crab meat. This was amazing and I ate the leftovers every night until it was gone!

Adapted from here
Ingredients:
  • 3 tomatoes cut into thin slices
  • 3 tablespoons olive oil
  • 1 1/2 teaspoons thyme
  • salt & pepper
  • 5 slices white sandwich bread, chopped into small pieces
  • 2 tablespoons butter
  • 1 lb elbow macaroni
  • 2 cups chicken stock
  • 5 tablespoons flour
  • Pinch of nutmeg
  • 2 cups skim milk
  • 8 ounces shredded extra-sharp cheddar cheese
  • 4 ounces shredded Parmesan cheese
  • 8 ounces finely chopped crabmeat

    Preheat oven to 400 degrees.

    Spread tomatoes in a single layer on a 9x13 baking dish. Drizzle tomatoes with oil, thyme, salt and pepper.

  • Melt 1 tablespoon butter with remaining tablespoon oil in a medium skillet over medium heat. Add bread and toss to coat. Season with salt and pepper.

    Cook pasta according to package directions. Drain and let cool.


    Whisk 1/2 cup chicken stock into the flour in a medium bowl.

    Melt remaining tablespoon of butter in a medium saucepan over medium heat. Stir in nutmeg, 1 teaspoon salt, milk, flour and chicken stock. Bring to a boil, whisking often. Reduce to a simmer. Cook 8 minutes and be sure to mix often.

    Add cheeses; cook, stirring, until melted. Pour into a large bowl and mix with cooked macaroni and crabmeat. Pour mixture over tomato slices in baking pan.

    Bake for about 30 minutes or until golden brown and bubbling.


    Amazing! Seconds please!

    Tuesday, February 21, 2012

    DIY Hanging Wall Letters

    So maybe my baby is just about 6 months old now and these letters have been up for over 6 months. It's better to be late than to never post this, right?

    How can you have a nursery without the wall letters these days? I hate doing things that are super trendy, but I really wanted the letters and came up with a hanging method that's pretty unique. This project was a combined effort from Hubby and I and it was really fun to work on a craft together!

    Please forgive me for not taking the time to Photoshop these properly. I'm a graphic designer by day and don't have the energy or motivation to use it even more at night. The color is slightly off! The letters are actually navy blue with bright red ribbon, but they look more like black with orange/red ribbon.

    So I (well, Hubby did it since he wouldn't let me near spray paint while I was pregnant) started out by spray painting the letters. Like our little cardboard spray paint work area? I had a few more projects I was also working on at the time. Hubby got really into helping with this, so he made those thin wood strips and covered them in painter's tape. He decided it would be easier to make sure the whole letter got painted by having the propped up.
    After the paint dried, we used a staple gun to attach the ribbon to the back of the letters.
    Now comes the complicated part...
    I wanted to hang the letters on something, but nails or thumbtacks just seemed too boring and wouldn't fit with the room. I'm so proud that I came up with this idea of using drawer knobs and it actually worked! With some help from Hubby and Kitty, we figured out a way to make this work.

    We bought 6 drawer knobs from the store. But if you look at the hardware that comes with knobs, the screws are flat on one side because they sit inside a drawer. In this case, that wouldn't work for the wall. We found these long pieces that look like screws, but they don't have a top or pointy bottom. We cut them into smaller pieces to use on the wall.
    In order to get the screws into the wall, we used hollow wall anchors on each one. Then the drawer knobs could be screwed into the other side easily.

    Time to pull out the laser level Hubby got as a gift a few years ago! This was the perfect excuse to use it and it worked great.

    I laid out the letters on the floor so I could measure the distance between each one and then we could match it on the wall.

    Here's the wall with the hollow wall anchors and screws.

    As I said, it was really easy to screw the knob onto the wall once everything was up.


    And here's all the letters hanging from the wall!

    We love how it came out and it's so fun to walk in the nursery and see all our hard work!

    Wednesday, February 15, 2012

    Creative photo display ideas?

    Like every new mom, I'm obsessed with taking photos of my baby and showing them off to anyone who will look. My tribute to Connor at work is getting a little out of hand already! (I didn't do that desktop photo though. That was my coworker's idea to welcome me back after maternity leave)
    To the left of my computer, I started adding more and more photos each week as I pick my favorites. I think it's getting a little crazy and I need a way to display them in an organized way. (Remember, I work in a cube with gray fabric walls, so it's not like I can do all this crazy stuff in there.) I had fun doing some internet browsing one night for some ideas.

    Here's what I found and PLEASE leave me some comments with your ideas as well!

    Clothespins
    I figured I'd see a lot of versions of the clothespin displays. It's easy and cheap!

    Ribbon Wall
    Photos on ribbons is a good idea! Wouldn't it be nice if I could have the cupcake tower at work too?

    Gutter Topper
    This caught my eye because it was made from gutter toppers. I don't think that's the technical name because I'm not sure what they are and I frequent Home Depot a lot. Still, it's a very interesting idea that looks great.

    Tree
    Not appropriate for work, but I still loved the idea!

    Silver Clips
    This caught my eye because these silver clips from Ikea look like binder clips. And binder clips are very work-friendly, right?

    Clipboards
    This is really creative! It takes up a lot of space, but it would be fun if I had a big open wall.

    Cable Display
    This was a Pottery Barn knock-off idea that looks really nice. I like that they used it for kids' artwork too!
    So what display ideas have you tried in your house or at work?

    Monday, February 13, 2012

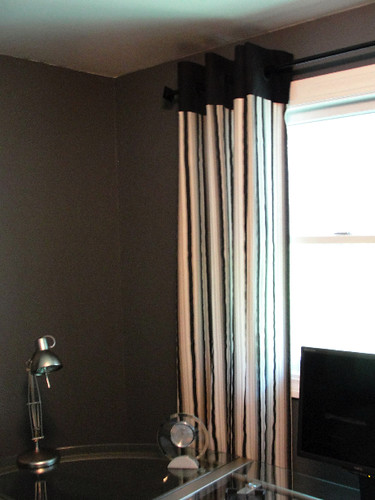
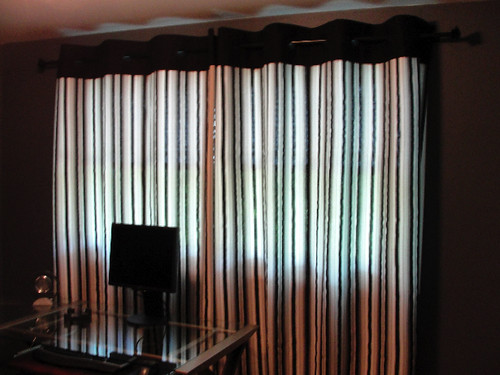
    DIY Grommet Man Cave Curtains

    The man room is the one place in the house that I don't get to decorate. I can have my opinion, but in the end, it's Hubby who decides how he wants to decorate. However, I did offer to make manly curtains for the room to block out the sun while he plays video games!

    DSC02067

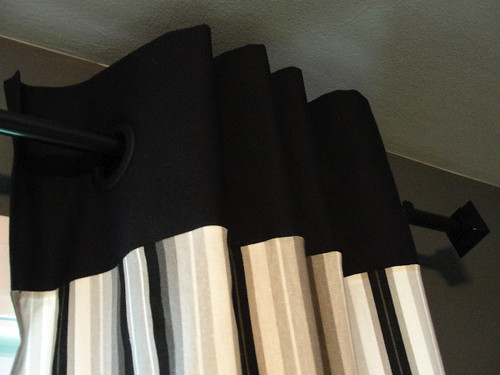
    First, I special ordered 10 yards of striped fabric (picked by Hubby) for the curtains. For the black portion at the top, I bought a heavy industrial fabric so the grommets wouldn't pull on the fabric and rip it.

    I washed and ironed all my fabric before starting. Annoying, but worth it in the end.
    I attached the black fabric to the striped curtain panels.
    I finished all the edges except the bottom and cut off the excess.
    I've never used grommets before, but it was pretty easy to follow. Each package came with a template and 8 grommets.

    I measured each curtain panel and marked the area where I wanted each grommet placed.
    Then I used the template to mark each circle.I cut out all the holes a little smaller than the size of the cirlce. I'd rather be too small and have to cut more than have a hole that's too big and can't be fixed.
    The front and back grommet pieces snap on and I tucked the excess fabric inside.
    (FYI, snapping the grommet was a bit of a challenge with such heavy fabric. This is where Hubby is asked to help!)
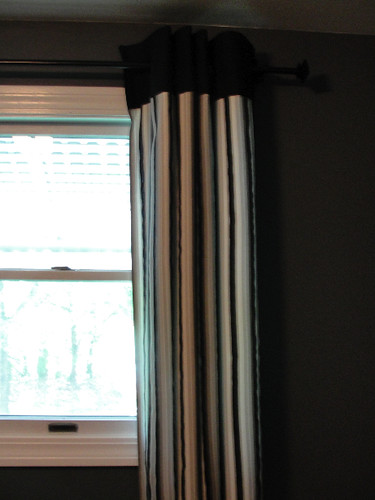
    Finally, I hung up the curtains and then hemmed the bottom so they almost hit the floor.
    DSC02065

    DSC02069

    DSC02066

    DSC02062

    Wednesday, February 8, 2012

    Our love story

    I saw this link party about Valentine's Day and thought it might be a fun way to get in the lovey dovey mood and celebrate one of my favorite holidays!

    1. How long have you and your significant other been together? 10 years and 6 days (I only know this because our 10 year date-aversary was 6 days ago!)

    2. How did you meet? {What's your "love" story?} My friends and I were at a frat party dancing in their party room. I saw my friends chatting with some cute guys so I went over to join in and meet them. One of the guys shoved a cute guy with glasses towards me and said, "Hey, dance with him!" I thought he was cute so I figured I'd dance with him. We danced for awhile and then ended up going with our friends to another frat house later in the night. When the after party was over, he came back to my dorm and we stayed up most of the night talking. That was pretty much it and we've been together ever since that night!
    This is a photo of us in my dorm room a few months after we met.


    3. If married, how long have you been married? If not, is this the guy you hope to marry? {do tell} We've been married for 4.5 years.

    4. If you are married, where did you get married at? Big or small wedding? If not, where would you like to get married? And will it be big or small?
    We got married outdoors by a garden & waterfall and had the reception outside looking out onto the garden and lake.

    5. Do you have any nick-names that you call one another? Do share!
    We have a lot of stupid nicknames that we randomly use such a Honeypoo, Sillypoo, Lubber (Lover said in a silly way)

    6. Name 3 things you love most about your honey.
    He's respectful and polite to everyone - no matter who it is.

    He's can always cheer me up when I'm sad or upset.

    He's a great father.

    7. Tell us how he proposed? Or your ideal proposal?
    It was a complete surprise because I wasn't expecting to get engaged for another few months. I had only been graduated from college for a month and he just started his first job after graduating. We were hanging out in my childhood bedroom and he pulled the ring out from under the bed.

    8. Is he a flowers and teddy bear kind of guy for v-day, or strawberries, champagne, and rose petals?
    I don't consider him a stereotypical gift-giver, but if I had to pick one, it would be flowers and teddy bears. He knows I love getting flowers, but we both agree they're usually very overpriced and not worth it. He also knows I love soft and cute stuffed animals, so I've gotten my share of them during the past 10 years.
    Flowers from Valentine's Day 2010

    9. Are you a sunset dinner on the beach kind of girl, or pop a movie in and relax on the couch?
    Again, I don't think I'm really either of those. I would probably enjoy a sunset dinner on the beach more, but I love surprises much more than that. I absolutely love being surprised with something out of the ordinary!

    10. Tell us one thing you'd like to do with your significant one day. If you could do anything? Go anywhere?
    We occasionally talk about how we'd love to go to Italy one day. We hardly ever go on vacation, so it would be a fun adventure for us. This photo was from our first vacation together when we went to Mexico. Holy sunburn!
    11. Tell us what you plan on doing on this Valentine's Day.
    I really don't know which kinda makes me sad. We've been so busy this year with a little baby to take care of! It's also on a Tuesday which makes things more difficult. Weekends would be much better! We've made homemade pizzas from scratch for several of the past Valentine's Day holidays, so we may do that again. This one is from 2008 when we made 2 kinds of pizza and dessert pizza that we learned in our pizza making class.

    12. Are you asking for anything this Valentine's day?
    Nothing specific, but I hope to at least get a card. I got a very generous holiday gift, so I don't expect too much this year.

    13. Give us one piece of advice of keeping a relationship strong and full of love.
    Communication - Not that we're perfect with this, but I think it's the key to making a relationship work.

    14. Show us a picture of what love means to you.
    Nothing explains our love more than a photo of the person we would both do anything for. Our little Valentine!

    Tuesday, February 7, 2012

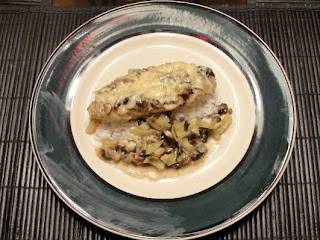
    Tasty Artichoke & Mushroom Chicken


    This is an awesome dinner! The flavors were great and I would definitely make it again!

    Adapted from Annie's Eats
    Ingredients:
    • 1/2 cup flour
    • 1/4 teaspoon basil
    • 1/4 teaspoon thyme
    • 1/4 teaspoon parsley
    • 1/4 teaspoon oregano
    • 1/4 teaspoon salt
    • 1/4 teaspoon pepper
    • 4 boneless chicken breasts
    • 2 tbsp. olive oil
    • 1 tbsp. butter
    • 2 cups diced mushrooms
    • 1 (14 oz.) container of artichoke hearts, drained and diced
    • 2/3 cup chicken broth
    • shredded Parmesan cheese

    In a shallow bowl, mix flour, herbs, salt and pepper. Save 1 tablespoon of the mixture for later.

    Coat the chicken in the flour mixture.

    Heat olive oil in a pan over medium-high heat. Add the coated chicken to the pan and cook until golden brown and cooked through.

    Add the butter to the pan and warm until melted. Pour in mushrooms and artichokes and cook until vegetables are soft, about 5 minutes.

    Combine the chicken broth and reserved tablespoon of flour and whisk until smooth. Add the liquid to the skillet, cooking until warm. Remove from heat.

    Serve over white or brown rice and top with shredded parmesan cheese.


    Sunday, February 5, 2012

    Baby Magnetic Train Letters

    The baby's room never had a theme, but I started getting really into trains as I looked for cute decor. I could not resist these adorable magnetic train letters I found! It was quite a trek for me to find all the letters I needed, but after 4 stores, I collected them all!
    I did a light sanding on all the letters before I got started just to clean up some of the rough edges. I used some acrylic craft paint to add some color. Perfect craft to do while you watch tv!

    It was very easy to do. You just have to have some patience and a steady hand since they're so small.


    Related Posts with Thumbnails